|
Wait
Event
|
Possible
Causes
|
Look
For / Examine
|
|
|
buffer
busy
waits
|
Buffer
cache, DBWR
|
Dependent
on type of buffer:
|
Examine
V$SESSION_WAIT
while the problem is occurring to determine the type of block
contended for.
|
|
free
buffer
waits
|
Buffer
cache, DBWR, I/O
|
Cache
too small
|
Check
buffer cache statistics for evidence of too small cache.
|
|
db
file
scattered
read
|
I/O,
SQL statement tuning
|
Slow
I/O system
|
Cross-check
I/O system and
V$FILESTAT
for poor read time. |
|
db
file
sequential
read
|
I/O,
SQL statement tuning
|
Slow
I/O system
|
Cross-check
I/O system and
V$FILESTAT
for poor read time. |
|
enqueue
|
Locks
|
Depends
on type of enqueue
|
Look
at
V$ENQUEUE_STAT.
|
|
latch
free
|
Latch
contention
|
Depends
on latch
|
Check
   V$LATCH.
|
|
log
buffer space
|
Log
buffer, I/O
|
Slow
I/O system
|
Check
the statistic redo buffer allocation retries in
V$SYSSTAT.
Check configuring log buffer section
Check
the disks that house the online redo logs for resource
contention.
|
|
log
file sync
|
I/O,
over- committing
|
Un-batched
commits
|
Check
the number of transactions (commits + rollbacks) per second, from
V$SYSSTAT. |
Friday, June 29, 2012
Wait Events and Potential Causes in Oracle

Monday, June 25, 2012
How to avoid ORA-21561 : OID generation failed
Today we had to create a new test database in our virtual environment ...
our sys admin has duplicated an existing one but when i started to create a database with dbca, ive got an ORA-21561 : OID generation failed
I edited the /etc/hosts file and verify that the local node is correctly identified with a mapping for both the short and fully qualified name of the host.
our sys admin has duplicated an existing one but when i started to create a database with dbca, ive got an ORA-21561 : OID generation failed
I edited the /etc/hosts file and verify that the local node is correctly identified with a mapping for both the short and fully qualified name of the host.
Friday, June 22, 2012
How to configure Firewall rules in Red Hat for Oracle listener with iptables
One of our Oracle databases is running on RedHat Enterprise Linux 5.3. Listener is running on 1521
But I can connect to the database only from server itself. From no other machines I can connect to my database. IPTables is blocking them on 1521.
So, I’m adding a new rule to IPTables so any traffic to 1521 is allowed.
I added the rule, saved the rule and restarted the IPTables service. Saving and restarting is not required to have the rule to be active but better not to let the rule forgotten.
iptables -I INPUT -p tcp –dport 1521 -j ACCEPT
Now, it works. I can connect from other machines
But I can connect to the database only from server itself. From no other machines I can connect to my database. IPTables is blocking them on 1521.
So, I’m adding a new rule to IPTables so any traffic to 1521 is allowed.
I added the rule, saved the rule and restarted the IPTables service. Saving and restarting is not required to have the rule to be active but better not to let the rule forgotten.
iptables -I INPUT -p tcp –dport 1521 -j ACCEPT
Now, it works. I can connect from other machines
Tuesday, June 19, 2012
How does the character set affect Import/Export in Oracle
Import and Export are client products, in the same way as SQL*Plus or
Oracle Forms, and will therefore translate characters from the database
character set to that defined by NLS_LANG. The character set used for
the export will be stored in the export file and when the file is
imported, the import will check the character set that was used. If it
is different than that defined by NLS_LANG at the import site, the
characters will be translated to the import character set and then, if
necessary to the database character set.
Oracle recommends setting the character set part of the NLS_LANG environment variable to the same character set as the character set of the database you are using.
This query can help you to check the NLS_CHARACTERSET on the SOURCE database
SQL> select * from nls_database_parameters ;
Before running Oracle imp to import data set the NLS_LANG set to AMERICAN_AMERICA.WE8MSWIN1252 (=source NLS_CHARACTERSET)
On Unix this would be: export NLS_LANG=AMERICAN_AMERICA.WE8MSWIN1252;
On Windows this would be: C:\>set NLS_LANG=AMERICAN_AMERICA.WE8MSWIN1252;
Oracle recommends setting the character set part of the NLS_LANG environment variable to the same character set as the character set of the database you are using.
This query can help you to check the NLS_CHARACTERSET on the SOURCE database
SQL> select * from nls_database_parameters ;
Before running Oracle imp to import data set the NLS_LANG set to AMERICAN_AMERICA.WE8MSWIN1252 (=source NLS_CHARACTERSET)
On Unix this would be: export NLS_LANG=AMERICAN_AMERICA.WE8MSWIN1252;
On Windows this would be: C:\>set NLS_LANG=AMERICAN_AMERICA.WE8MSWIN1252;
Saturday, June 16, 2012
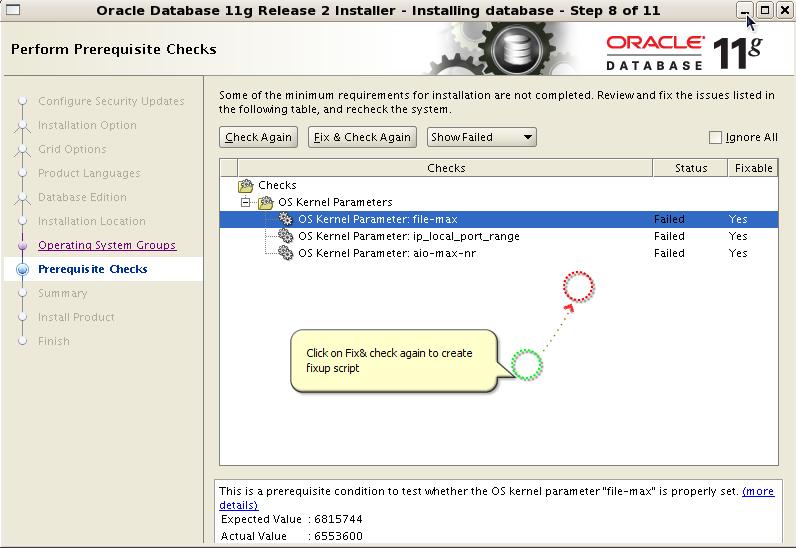
Quickest way to install Oracle 11gR2 on Linux / Unix
- Create Oracle groups oinstall and dba
- Create Oracle user oracle in groups oinstall and dba
- Download the installations files from Oracle site (in /u03 for example)
- unzip the installations files in the same folder
- navigate to the database folder ( cd /u03/database )
- define your DISPLAY variable ( export DISPLAY=your_ip_adress:0) you can use an free X Server like MobaXterm Personal Edition
- launch the runInstaller program ( ./runInstaller )
- In the prerequite checks page, click on Fix & Check again to create a fixup script

Wednesday, June 13, 2012
Allow oracle operating system user to schedule jobs on Linux / Unix
As the root user, add oracle to the /etc/cron.allow file with the echo command:
echo oracle >> /etc/cron.allow
Once the oracle entry is added to the /etc/cron.allow file, the os user oracle can use the crontab utility
to schedule a job
The root user can always schedule jobs with the crontab utility. Other users must be listed in
the /etc/cron.allow file. If the /etc/cron.allow file does not exist, then the operating system
user must not appear in the /etc/cron.deny file. If neither the /etc/cron.allow nor the /etc/
cron.deny file exists, then only the root user can access the crontab utility.
echo oracle >> /etc/cron.allow
Once the oracle entry is added to the /etc/cron.allow file, the os user oracle can use the crontab utility
to schedule a job
The root user can always schedule jobs with the crontab utility. Other users must be listed in
the /etc/cron.allow file. If the /etc/cron.allow file does not exist, then the operating system
user must not appear in the /etc/cron.deny file. If neither the /etc/cron.allow nor the /etc/
cron.deny file exists, then only the root user can access the crontab utility.
Manually removing orphaned Oracle memory structures in Linux
You can view the structures to be removed with the ipcs -sm command:
$ ipcs -sm
------ Shared Memory Segments --------key shmid owner perms bytes nattch status
0xb3e36378 32768 oracle 640 421527552 16
0x34525e84 65537 oracle 640 421527552 11
------ Semaphore Arrays --------key semid owner perms nsems
0x288e2800 360448 oracle 640 126
0x288e2801 393217 oracle 640 126
0x288e2802 425986 oracle 640 126
If you’re working on a server that has multiple Oracle instances running, ensure that you remove
the correct memory structure. If you remove the wrong structure, you will inadvertently crash another database.
You can use the sysresv Oracle utility to verify which memory structures belong
to the orphaned instance
By running the Oracle sysresv utility (located in the ORACLE_HOME/bin
directory). This command reports on memory structures that correspond to your current instance
setting of ORACLE_SID. Run this command as the owner of the Oracle binaries (usually oracle):
$ sysresv
IPC Resources for ORACLE_SID "REV10" :
Shared Memory:
ID KEY
2424843 0x00000000
2457612 0x00000000
2490381 0xa4746610
Semaphores:
ID KEY
2457602 0x62f172a8
Oracle Instance alive for sid "REV10"
You can remove memory objects either by the key or by ID. This next example uses the -m
option to remove a shared memory segment by its ID:
$ ipcrm -m 2686990
This next example uses the -s option to remove semaphore arrays using IDs:
$ ipcrm -s 2719748
You can verify that the memory structures have been removed by running sysresv again
$ ipcs -sm
------ Shared Memory Segments --------key shmid owner perms bytes nattch status
0xb3e36378 32768 oracle 640 421527552 16
0x34525e84 65537 oracle 640 421527552 11
------ Semaphore Arrays --------key semid owner perms nsems
0x288e2800 360448 oracle 640 126
0x288e2801 393217 oracle 640 126
0x288e2802 425986 oracle 640 126
If you’re working on a server that has multiple Oracle instances running, ensure that you remove
the correct memory structure. If you remove the wrong structure, you will inadvertently crash another database.
You can use the sysresv Oracle utility to verify which memory structures belong
to the orphaned instance
By running the Oracle sysresv utility (located in the ORACLE_HOME/bin
directory). This command reports on memory structures that correspond to your current instance
setting of ORACLE_SID. Run this command as the owner of the Oracle binaries (usually oracle):
$ sysresv
IPC Resources for ORACLE_SID "REV10" :
Shared Memory:
ID KEY
2424843 0x00000000
2457612 0x00000000
2490381 0xa4746610
Semaphores:
ID KEY
2457602 0x62f172a8
Oracle Instance alive for sid "REV10"
You can remove memory objects either by the key or by ID. This next example uses the -m
option to remove a shared memory segment by its ID:
$ ipcrm -m 2686990
This next example uses the -s option to remove semaphore arrays using IDs:
$ ipcrm -s 2719748
You can verify that the memory structures have been removed by running sysresv again
Subscribe to:
Posts (Atom)