Showing posts with label Installation. Show all posts
Showing posts with label Installation. Show all posts
Saturday, September 15, 2012

Saturday, September 1, 2012
Upgrading from 11gr1 to 11gr2 Using Data Pump Export/Import
- Export data from the current database using the Export utility shipped with the
current database - Install the new Oracle Database software
- If the new database has the same name as the current database, then shut down
the current database before creating the new database - Create the new database
- Start SQL*Plus in the new Oracle Database environment
- Connect to the database instance as a user with SYSDBA privileges
- Start an Oracle Database instance using STARTUP
- Optionally, you can change the storage parameters from the source database
- Use the Import utility of the new database to import the objects exported from the
current database - After the import, check the import log file for information about which imports of
which objects completed successfully and, if there were failures, which failed - If changes are made to the current database after the export, then make sure those
changes are propagated to the new database before making it available to users
Script to Check for invalid objects
spool invalid_pre.lst
select substr(owner,1,12) owner,
substr(object_name,1,30) object,
substr(object_type,1,30) type, status from
dba_objects where status <>'VALID';
spool off
select substr(owner,1,12) owner,
substr(object_name,1,30) object,
substr(object_type,1,30) type, status from
dba_objects where status <>'VALID';
spool off
Saturday, July 21, 2012
Oracle 9.2.0.4 real installation guide for RHEL-5 64-BIT
1. Make sure Java libraries are up to date.. (sysad side..)
2. Do not start installation from the 9204 base installation- Oracle Universal Installer has problem
2.1 Install first the OUI "only" from the 9206 patchset (p3948480_9206_Linux-x86-64.zip)
using the Oracle_Home youve just decided
2.2 In ../Disk1/install/oraparam.ini edit the Linux value under [Certified Versions]
Linux=redhat-2.1AS,redhat-2.1,redhat-3,redhat-4,redhat-5,UnitedLinux-1.0,SuSE-9,SuSE-
* value must include redhat-5 inorder to suppress the error message for OS version incompat.
2.3 After completion of OUI install, edit again ../product/9204/oui/oraparam.ini as instructed
in step 2.2
2.4 Now install the 9204 base using the OUI from 9206. Run ../product/9204/oui/runInstaller BUT
this time, select the "products.jar" from 9204 base installation set.
(ex: /u01/app/oracle/Disk1/stage/products.jar)
2.5 From here u should be able to install the SOFTWARE ONLY option. DO NOT create a database yet.
3. Patch the 9204 base with the 9207 patchset (p4163445_92070_Linux-x86-64.zip)
3.1 After decompressing contents, repeat step 2.2 again to suppress OS version incompat.
3.2 Now proceed with the patch application
4. You can now create a database using the "dbca" utility.
2. Do not start installation from the 9204 base installation- Oracle Universal Installer has problem
2.1 Install first the OUI "only" from the 9206 patchset (p3948480_9206_Linux-x86-64.zip)
using the Oracle_Home youve just decided
2.2 In ../Disk1/install/oraparam.ini edit the Linux value under [Certified Versions]
Linux=redhat-2.1AS,redhat-2.1,redhat-3,redhat-4,redhat-5,UnitedLinux-1.0,SuSE-9,SuSE-
* value must include redhat-5 inorder to suppress the error message for OS version incompat.
2.3 After completion of OUI install, edit again ../product/9204/oui/oraparam.ini as instructed
in step 2.2
2.4 Now install the 9204 base using the OUI from 9206. Run ../product/9204/oui/runInstaller BUT
this time, select the "products.jar" from 9204 base installation set.
(ex: /u01/app/oracle/Disk1/stage/products.jar)
2.5 From here u should be able to install the SOFTWARE ONLY option. DO NOT create a database yet.
3. Patch the 9204 base with the 9207 patchset (p4163445_92070_Linux-x86-64.zip)
3.1 After decompressing contents, repeat step 2.2 again to suppress OS version incompat.
3.2 Now proceed with the patch application
4. You can now create a database using the "dbca" utility.
Monday, June 25, 2012
How to avoid ORA-21561 : OID generation failed
Today we had to create a new test database in our virtual environment ...
our sys admin has duplicated an existing one but when i started to create a database with dbca, ive got an ORA-21561 : OID generation failed
I edited the /etc/hosts file and verify that the local node is correctly identified with a mapping for both the short and fully qualified name of the host.
our sys admin has duplicated an existing one but when i started to create a database with dbca, ive got an ORA-21561 : OID generation failed
I edited the /etc/hosts file and verify that the local node is correctly identified with a mapping for both the short and fully qualified name of the host.
Saturday, June 16, 2012
Quickest way to install Oracle 11gR2 on Linux / Unix
- Create Oracle groups oinstall and dba
- Create Oracle user oracle in groups oinstall and dba
- Download the installations files from Oracle site (in /u03 for example)
- unzip the installations files in the same folder
- navigate to the database folder ( cd /u03/database )
- define your DISPLAY variable ( export DISPLAY=your_ip_adress:0) you can use an free X Server like MobaXterm Personal Edition
- launch the runInstaller program ( ./runInstaller )
- In the prerequite checks page, click on Fix & Check again to create a fixup script
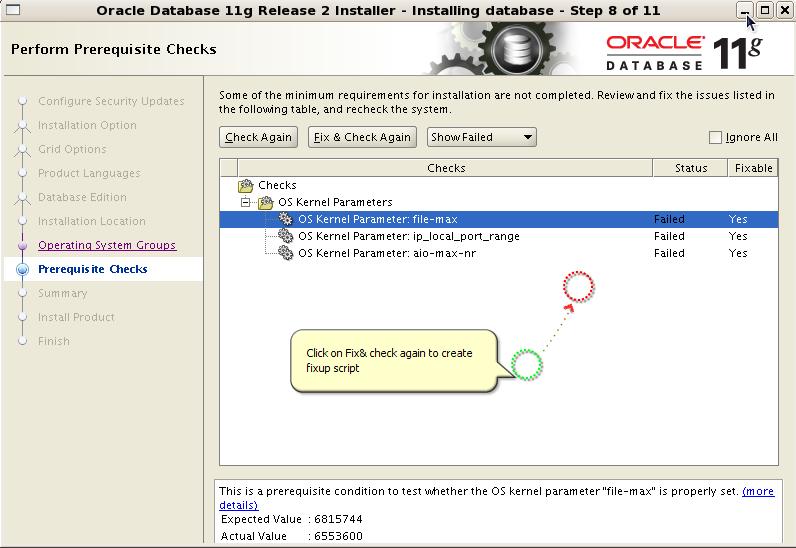

Tuesday, June 12, 2012
Different ways to modify linux kernel parameters for Oracle installation
There are several valid techniques for changing kernel parameters beforeperforming a database installation :
following command changes the kernel semaphore settings in the /proc/sys/kernel/sem
virtual file:
sysctl -w kernel.sem="250 32000 100 128"
To make changes persist across system reboots, use your favorite editor (like vi) to add the
parameters to the /etc/sysctl.conf file.
to make desired kernel parameter changes. This example uses vi to first edit the /etc/
sysctl.conf file:
vi /etc/sysctl.conf
Add changes and then exit...
After you modify the /etc/sysctl.conf file, you can use the sysctl -p command to make the
entries in the /etc/sysctl.conf file instantiated as the current values used by the Linux kernel:
sysctl -p
The previous command loads into memory the values found in the /etc/sysctl.conf file.
You can verify that the values were changed by using cat to view the corresponding virtual file.
example writes the values 250 32000 100 128 to the virtual /proc/sys/kernel/sem file using the
echo command:
echo 250 32000 100 128 > /proc/sys/kernel/sem
The previous command immediately changes the kernel settings for the sem (semaphores)
parameter. If you want the change to persist across system reboots, then you also need to add
an entry to the /etc/sysctl.conf file. This file is read when the system boots to determine the
settings for kernel parameters. You can edit the /etc/sysctl.conf file directly (with an editor
such as vi) and add the following line:
kernel.sem = 250 32000 100 128
Alternatively, you can use the echo command to add the desired parameters to the end of
the /etc/sysctl.conf file, as shown here:
echo "kernel.sem = 250 32000 100 128" >> /etc/sysctl.conf
Notice that the previous command uses >> to concatenate the desired entry to the bottom
of the /etc/sysctl.conf file. You would not want to use just a single right arrow >, because that
would overwrite the contents of /etc/sysctl.conf.
the same time. First use the cat command to add entries to the /etc/sysctl.conf file. This
example shows how to use cat to write typical kernel parameter settings for an Oracle database:
cat >> /etc/sysctl.conf <<EOF
kernel.shmall = 2097152
kernel.shmmax = 536870912
kernel.shmmni = 4096
kernel.sem = 250 32000 100 128
fs.file-max = 65536
net.ipv4.ip_local_port_range = 1024 65000
net.core.rmem_default = 262144
net.core.rmem_max = 262144
net.core.wmem_default = 262144
net.core.wmem_max = 262144
EOF
The previous command uses cat to write to the /etc/sysctl.conf file all the values encap-sulated between the two EOF markers. This allows you to add several parameters simultaneously
to the /etc/sysctl.conf file. When using cat and >> to write parameters to the /etc/sysctl.conf
file, there is no automatic checking to determine whether the parameters already exist in the file.
Using cat and >> will simply write to the bottom of the file.
After the desired changes are made, use the sysctl -p command to make the entries in the
/etc/sysctl.conf file the current values used by the Linux kernel, as shown here:
sysctl -p
Run sysctl
following command changes the kernel semaphore settings in the /proc/sys/kernel/sem
virtual file:
sysctl -w kernel.sem="250 32000 100 128"
To make changes persist across system reboots, use your favorite editor (like vi) to add the
parameters to the /etc/sysctl.conf file.
Edit sysctl.conf
to make desired kernel parameter changes. This example uses vi to first edit the /etc/
sysctl.conf file:
vi /etc/sysctl.conf
Add changes and then exit...
After you modify the /etc/sysctl.conf file, you can use the sysctl -p command to make the
entries in the /etc/sysctl.conf file instantiated as the current values used by the Linux kernel:
sysctl -p
The previous command loads into memory the values found in the /etc/sysctl.conf file.
You can verify that the values were changed by using cat to view the corresponding virtual file.
Add entries with echo
example writes the values 250 32000 100 128 to the virtual /proc/sys/kernel/sem file using the
echo command:
echo 250 32000 100 128 > /proc/sys/kernel/sem
The previous command immediately changes the kernel settings for the sem (semaphores)
parameter. If you want the change to persist across system reboots, then you also need to add
an entry to the /etc/sysctl.conf file. This file is read when the system boots to determine the
settings for kernel parameters. You can edit the /etc/sysctl.conf file directly (with an editor
such as vi) and add the following line:
kernel.sem = 250 32000 100 128
Alternatively, you can use the echo command to add the desired parameters to the end of
the /etc/sysctl.conf file, as shown here:
echo "kernel.sem = 250 32000 100 128" >> /etc/sysctl.conf
Notice that the previous command uses >> to concatenate the desired entry to the bottom
of the /etc/sysctl.conf file. You would not want to use just a single right arrow >, because that
would overwrite the contents of /etc/sysctl.conf.
- Add entries with cat
the same time. First use the cat command to add entries to the /etc/sysctl.conf file. This
example shows how to use cat to write typical kernel parameter settings for an Oracle database:
cat >> /etc/sysctl.conf <<EOF
kernel.shmall = 2097152
kernel.shmmax = 536870912
kernel.shmmni = 4096
kernel.sem = 250 32000 100 128
fs.file-max = 65536
net.ipv4.ip_local_port_range = 1024 65000
net.core.rmem_default = 262144
net.core.rmem_max = 262144
net.core.wmem_default = 262144
net.core.wmem_max = 262144
EOF
The previous command uses cat to write to the /etc/sysctl.conf file all the values encap-sulated between the two EOF markers. This allows you to add several parameters simultaneously
to the /etc/sysctl.conf file. When using cat and >> to write parameters to the /etc/sysctl.conf
file, there is no automatic checking to determine whether the parameters already exist in the file.
Using cat and >> will simply write to the bottom of the file.
After the desired changes are made, use the sysctl -p command to make the entries in the
/etc/sysctl.conf file the current values used by the Linux kernel, as shown here:
sysctl -p
Simple way to gather system and kernel informations from your Unix / Linux system
The Proc File System can be used to gather useful information about the system and the running kernel.
Some of the important files are listed below
Some of the important files are listed below
- /proc/cpuinfo - information about the CPU (model, family, cache size etc.)
- /proc/meminfo - information about the physical RAM, Swap space etc.
- /proc/mounts - list of mounted file systems
- /proc/devices - list of available devices
- /proc/filesystems - supported file systems
- /proc/modules - list of loaded modules
- /proc/version - Kernel version
- /proc/cmdline - parameters passed to the kernel at the time of starting
Subscribe to:
Posts (Atom)