Showing posts with label Unix / Linux. Show all posts

Saturday, June 7, 2014

shell script to delete all not used oracle semaphores and shared memory

Here, save and try this script (kill_ipcs.sh) on your shell:
#!/bin/bash

ME=`whoami`

IPCS_S=`ipcs -s | egrep "0x[0-9a-f]+ [0-9]+" | grep $ME | cut -f2 -d" "`
IPCS_M=`ipcs -m | egrep "0x[0-9a-f]+ [0-9]+" | grep $ME | cut -f2 -d" "`
IPCS_Q=`ipcs -q | egrep "0x[0-9a-f]+ [0-9]+" | grep $ME | cut -f2 -d" "`


for id in $IPCS_M; do
  ipcrm -m $id;
done

for id in $IPCS_S; do
  ipcrm -s $id;
done

for id in $IPCS_Q; do
  ipcrm -q $id;
done

Thursday, May 29, 2014

get_hugepages_settings.sh Linux bash script to compute values for the # recommended HugePages/HugeTLB configuration

#!/bin/bash
#
# hugepages_settings.sh
#
# Linux bash script to compute values for the
# recommended HugePages/HugeTLB configuration
#
# Note: This script does calculation for all shared memory
# segments available when the script is run, no matter it
# is an Oracle RDBMS shared memory segment or not.
# Check for the kernel version
KERN=`uname -r | awk -F. '{ printf("%d.%d\n",$1,$2); }'`
# Find out the HugePage size
HPG_SZ=`grep Hugepagesize /proc/meminfo | awk {'print $2'}`
# Start from 1 pages to be on the safe side and guarantee 1 free HugePage
NUM_PG=1
# Cumulative number of pages required to handle the running shared memory segments
for SEG_BYTES in `ipcs -m | awk {'print $5'} | grep "[0-9][0-9]*"`
do
   MIN_PG=`echo "$SEG_BYTES/($HPG_SZ*1024)" | bc -q`
   if [ $MIN_PG -gt 0 ]; then
      NUM_PG=`echo "$NUM_PG+$MIN_PG+1" | bc -q`
   fi
done
# Finish with results
case $KERN in
   '2.4') HUGETLB_POOL=`echo "$NUM_PG*$HPG_SZ/1024" | bc -q`;
          echo "Recommended setting: vm.hugetlb_pool = $HUGETLB_POOL" ;;
   '2.6' | '3.8') echo "Recommended setting: vm.nr_hugepages = $NUM_PG" ;;
    *) echo "Unrecognized kernel version $KERN. Exiting." ;;
esac
# End

Friday, April 11, 2014

You should manage shared memory carefully if you are running multiple oracle instances on the same server

The ipcs command on LINUX/UNIX systems can help you to monitor the ORACLE SGA by displaying the size of each shared memory segment of the SGA.
If an oracle instance crashes abruptly, it may be possible that some shared memory segments are not released, if this happen you can use the ipcrm command to remove these segments.
The SHMMAX system setting allows you to increase the maximum size of a single shared memory segment.

To see how many oracle shared memory segments are used on your system

[oracle@dbbckp ~]$ ipcs

------ Shared Memory Segments --------
key        shmid      owner      perms      bytes      nattch     status      
0x00000000 77266945   oracle     640        4096       0                       
0x00000000 77299714   oracle     640        4096       0                       
0xc8f5d818 77332483   oracle     640        4096       0                       
0x00000000 77004804   oracle     640        4096       0                       
0x00000000 77037573   oracle     640        4096       0                       
0x4975d098 77070342   oracle     640        4096       0                       

------ Semaphore Arrays --------
key        semid      owner      perms      nsems     
0x56565656 688142     root       666        3         
0x0000041e 786449     root       644        1         
0x000003d4 819218     root       644        1         
0x0000033d 851987     root       644        1         
0xe5873228 233832468  oracle     640        125       
0xe5873229 233865237  oracle     640        125       
0xe587322a 233898006  oracle     640        125       
0xe587322b 233930775  oracle     640        125       
0xe587322c 233963544  oracle     640        125       
0xe587322d 233996313  oracle     640        125       
0xe587322e 234029082  oracle     640        125       
0xe587322f 234061851  oracle     640        125       
0xe5873230 234094620  oracle     640        125       
0x66d899d4 233046045  oracle     640        125       

------ Message Queues --------
key        msqid      owner      perms      used-bytes   messages    
0x000004d2 65537      root       666        0            0 

But if your are running multiple oracle instances on the same server, this output doesn't tell you which  instance is using which segments.
You can use the oracle sysresv utility to identify segments used by an instance (ORACLE_SID = DRTEST)

[oracle@dbbckp ~]$ sysresv

IPC Resources for ORACLE_SID "DRTEST" :
Shared Memory:
ID              KEY
77004804        0x00000000
77037573        0x00000000
77070342        0x4975d098
Semaphores:
ID              KEY
233046045       0x66d899d4
233078814       0x66d899d5
233111583       0x66d899d6
233144352       0x66d899d7
233177121       0x66d899d8
233209890       0x66d899d9
233242659       0x66d899da
233275428       0x66d899db
233308197       0x66d899dc
Oracle Instance alive for sid "DRTEST"

Now you can use the ipcrm command to remove these segments

ipcrm -s <ID> for Semaphores
ipcrm -m <ID> for Shared Memory

Thursday, September 27, 2012

You should start the X-Window manager only when you really need it

I tend to do a lot of routine tasks from the command line. Most commercial Linux distributions, however, default to starting an X-Window manager following system initialization. That's a lot of system resources to have running.

To change this behavior, edit the /etc/inittab file and locate the line that reads: id:5:initdefault and change it to id:3:initdefault.The system will start with a command line login, and when the need arises to run a window manager, it's easy to simply type startx

Wednesday, July 25, 2012

Most useful grep Options

-h:   suppress file names in output
-w:   restrict search to whole words only
-c:   displays count of matching lines in each file, not the lines themselves
      (note this is not the same as $ grep index *.rb | wc -l)
-i:   ignore case
-l:   list only file names containing matching lines
-n:   precede each line with the line number where it was found
-v:   display all lines NOT matching pattern
-C:   Display NUM lines of context either side of matches
-B:   Display NUM lines of context Before the matches
-A:   Display NUM lines of context After the matches

-e pattern: 
      Search for a pattern. Can use multiple times on a line
-r:   Search recursively from the current or specificed directory
  --include=pattern:
      Only search in file names matching pattern
  --exclude=pattern:
      Do not search in file names matching pattern

Most useful awk programs

awk '{ if (NF > max) max = NF }
     END { print max }'
    This program prints the maximum number of fields on any input line. 
awk 'length($0) > 80'
    This program prints every line longer than 80 characters. The sole rule has
    a relational expression as its pattern, and has no action (so the default
    action, printing the record, is used).
awk 'NF > 0'
    This program prints every line that has at least one field. This is an easy
    way to delete blank lines from a file (or rather, to create a new file
    similar to the old file but from which the blank lines have been deleted).
awk '{ if (NF > 0) print }'
    This program also prints every line that has at least one field. Here we
    allow the rule to match every line, then decide in the action whether to
    print.
awk 'BEGIN { for (i = 1; i <= 7; i++)
               print int(101 * rand()) }'
    This program prints 7 random numbers from 0 to 100, inclusive. 
ls -l files | awk '{ x += $4 } ; END { print "total bytes: " x }'
    This program prints the total number of bytes used by files. 
expand file | awk '{ if (x < length()) x = length() }
                  END { print "maximum line length is " x }'
    This program prints the maximum line length of file. The input is piped
    through the expand program to change tabs into spaces, so the widths
    compared are actually the right-margin columns.
awk 'BEGIN { FS = ":" }
     { print $1 | "sort" }' /etc/passwd
    This program prints a sorted list of the login names of all users. 
awk '{ nlines++ }
     END { print nlines }'
    This programs counts lines in a file. 
awk 'END { print NR }'
    This program also counts lines in a file, but lets awk do the work. 
awk '{ print NR, $0 }'
    This program adds line numbers to all its input files, similar to `cat -n'.
awk -F "\"*,\"*" '{print $3}' file.csv
    CSV parsing, prints 3rd field

This can helps you remember the unix cron syntax


# * * * * * command to be executed
# - - - - -
# | | | | |
# | | | | +- - - - day of week (0 - 6) (Sunday=0)
# | | | +- - - - - month (1 - 12)
# | | +- - - - - - day of month (1 - 31)
# | +- - - - - - - hour (0 - 23)
# +- - - - - - - - minute (0 - 59)

Saturday, July 21, 2012

Oracle 9.2.0.4 real installation guide for RHEL-5 64-BIT

1. Make sure Java libraries are up to date.. (sysad side..)

2. Do not start installation from the 9204 base installation- Oracle Universal Installer has problem

2.1 Install first the OUI "only" from the 9206 patchset (p3948480_9206_Linux-x86-64.zip)
using the Oracle_Home youve just decided
2.2 In ../Disk1/install/oraparam.ini edit the Linux value under [Certified Versions]
Linux=redhat-2.1AS,redhat-2.1,redhat-3,redhat-4,redhat-5,UnitedLinux-1.0,SuSE-9,SuSE-
* value must include redhat-5 inorder to suppress the error message for OS version incompat.
2.3 After completion of OUI install, edit again ../product/9204/oui/oraparam.ini as instructed
in step 2.2
2.4 Now install the 9204 base using the OUI from 9206. Run ../product/9204/oui/runInstaller BUT
this time, select the "products.jar" from 9204 base installation set.
(ex: /u01/app/oracle/Disk1/stage/products.jar)
2.5 From here u should be able to install the SOFTWARE ONLY option. DO NOT create a database yet.
 
3. Patch the 9204 base with the 9207 patchset (p4163445_92070_Linux-x86-64.zip)
3.1 After decompressing contents, repeat step 2.2 again to suppress OS version incompat.
3.2 Now proceed with the patch application
 
4. You can now create a database using the "dbca" utility.

Thursday, July 5, 2012

How to get paging space informations on IBM AIX

To list the characteristics of all paging spaces, enter: lsps -a

       This displays the characteristics for all paging spaces and provides a listing similar to the following listing:

       Page Space      Physical Volume   Volume Group    Size %Used Active  Auto  Type
       hd6             hdisk0            rootvg         512MB     1     yes   yes    lv

Wednesday, July 4, 2012

Avoid double caching to improve disk I/O performance in Oracle

If Oracle data are stored in a Filesystem a Concurrent IO mount option can improve performance ...
  • Data is transfered directly from the disk to the application buffer, bypassing the file buffer cache hence avoiding double caching (filesystem cache + Oracle SGA)
  • Emulates a raw-device implementation
  • Give a faster access to the backend disk and reduce the CPU utilization
  • Disable the inode-lock to allow several threads to read and write the same file

Friday, June 22, 2012

How to configure Firewall rules in Red Hat for Oracle listener with iptables

One of our Oracle databases is running on RedHat Enterprise Linux 5.3. Listener is running on 1521

But I can connect to the database only from server itself. From no other machines I can connect to my database. IPTables is blocking them on 1521.

So, I’m adding a new rule to IPTables so any traffic to 1521 is allowed.

I added the rule, saved the rule and restarted the IPTables service. Saving and restarting is not required to have the rule to be active but better not to let the rule forgotten.

iptables -I INPUT -p tcp –dport 1521 -j ACCEPT

Now, it works. I can connect from other machines 


Tuesday, June 19, 2012

How does the character set affect Import/Export in Oracle

Import and Export are client products, in the same way as SQL*Plus or Oracle Forms, and will therefore translate characters from the database character set to that defined by NLS_LANG. The character set used for the export will be stored in the export file and when the file is imported, the import will check the character set that was used. If it is different than that defined by NLS_LANG at the import site, the characters will be translated to the import character set and then, if necessary to the database character set.

Oracle recommends setting the character set part of the NLS_LANG environment variable to the same character set as the character set of the database you are using.

This query can help you to check the NLS_CHARACTERSET on the SOURCE database

SQL> select * from nls_database_parameters ;

Before running Oracle imp to import data set the NLS_LANG set to AMERICAN_AMERICA.WE8MSWIN1252 (=source NLS_CHARACTERSET)

On Unix this would be: export NLS_LANG=AMERICAN_AMERICA.WE8MSWIN1252;
On Windows this would be: C:\>set NLS_LANG=AMERICAN_AMERICA.WE8MSWIN1252;


Saturday, June 16, 2012

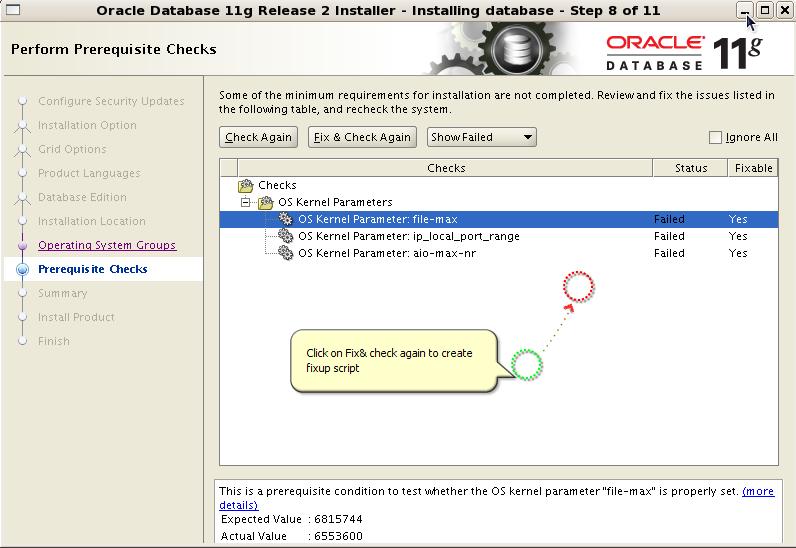
Quickest way to install Oracle 11gR2 on Linux / Unix

  • Create Oracle groups oinstall and dba
  • Create Oracle user oracle in groups oinstall and dba
  • Download the installations files from Oracle site (in /u03 for example)
  • unzip the installations files in the same folder
  • navigate to the database folder ( cd /u03/database )
  • define your DISPLAY variable ( export DISPLAY=your_ip_adress:0) you can use an free X Server like MobaXterm Personal Edition
  • launch the runInstaller program ( ./runInstaller )
  • In the prerequite checks page, click on Fix & Check again to create a fixup script

Wednesday, June 13, 2012

Allow oracle operating system user to schedule jobs on Linux / Unix

As the root user, add oracle to the /etc/cron.allow file with the echo command:

echo oracle >> /etc/cron.allow

Once the oracle entry is added to the /etc/cron.allow file, the os user oracle can use the crontab utility
to schedule a job

The root user can always schedule jobs with the crontab utility. Other users must be listed in
the /etc/cron.allow file. If the /etc/cron.allow file does not exist, then the operating system
user must not appear in the /etc/cron.deny file. If neither the /etc/cron.allow nor the /etc/
cron.deny
file exists, then only the root user can access the crontab utility.


Manually removing orphaned Oracle memory structures in Linux

You can view the structures to be removed with the ipcs -sm command:
$ ipcs -sm

------ Shared Memory Segments --------key        shmid      owner      perms      bytes         nattch     status
0xb3e36378                                                        32768      oracle       640        421527552  16
0x34525e84                                                        65537      oracle       640        421527552  11

------ Semaphore Arrays --------key        semid      owner      perms      nsems
0x288e2800                                             360448     oracle      640        126
0x288e2801                                             393217     oracle      640        126
0x288e2802                                             425986     oracle      640        126

If you’re working on a server that has multiple Oracle instances running, ensure that you remove
the correct memory structure. If you remove the wrong structure, you will inadvertently crash another database.

You can use the sysresv Oracle utility to verify which memory structures belong
to the orphaned instance
By running the Oracle sysresv utility (located in the ORACLE_HOME/bin
directory). This command reports on memory structures that correspond to your current instance
setting of ORACLE_SID. Run this command as the owner of the Oracle binaries (usually oracle):

$ sysresv

IPC Resources for ORACLE_SID "REV10" :
Shared Memory:
ID                        KEY
2424843         0x00000000
2457612         0x00000000
2490381         0xa4746610
Semaphores:
ID                         KEY
2457602         0x62f172a8
Oracle Instance alive for sid "REV10"

You can remove memory objects either by the key or by ID. This next example uses the -m
option to remove a shared memory segment by its ID:

$ ipcrm -m 2686990

This next example uses the -s option to remove semaphore arrays using IDs:

$ ipcrm -s 2719748

You can verify that the memory structures have been removed by running sysresv again

Tuesday, June 12, 2012

Different ways to modify linux kernel parameters for Oracle installation

There are several valid techniques for changing kernel parameters beforeperforming a database installation :
  • Run sysctl

Use the sysctl command with the -w option to dynamically modify kernel parameters. The
following command changes the kernel semaphore settings in the /proc/sys/kernel/sem
virtual file:

sysctl -w kernel.sem="250 32000 100 128"

To make changes persist across system reboots, use your favorite editor (like vi) to add the
parameters to the /etc/sysctl.conf file.
  • Edit sysctl.conf

You can also directly modify the /etc/sysctl.conf file and then use the sysctl -p command
to make desired kernel parameter changes. This example uses vi to first edit the /etc/
sysctl.conf file:

vi /etc/sysctl.conf

Add changes and then exit...
After you modify the /etc/sysctl.conf file, you can use the sysctl -p command to make the
entries in the /etc/sysctl.conf file instantiated as the current values used by the Linux kernel:

sysctl -p

The previous command loads into memory the values found in the /etc/sysctl.conf file.
You can verify that the values were changed by using cat to view the corresponding virtual file.
  • Add entries with echo

You can use the echo command to write the desired output to the specified virtual file. This
example writes the values 250 32000 100 128 to the virtual /proc/sys/kernel/sem file using the
echo command:

echo 250 32000 100 128 > /proc/sys/kernel/sem

The previous command immediately changes the kernel settings for the sem (semaphores)
parameter. If you want the change to persist across system reboots, then you also need to add
an entry to the /etc/sysctl.conf file. This file is read when the system boots to determine the
settings for kernel parameters. You can edit the /etc/sysctl.conf file directly (with an editor
such as vi) and add the following line:

kernel.sem = 250 32000 100 128

Alternatively, you can use the echo command to add the desired parameters to the end of
the /etc/sysctl.conf file, as shown here:

echo "kernel.sem = 250 32000 100 128" >> /etc/sysctl.conf

Notice that the previous command uses >> to concatenate the desired entry to the bottom
of the /etc/sysctl.conf file. You would not want to use just a single right arrow >, because that
would overwrite the contents of /etc/sysctl.conf.
  • Add entries with cat
The technique shown here is handy for adding several entries to the /etc/sysctl.conf file at
the same time. First use the cat command to add entries to the /etc/sysctl.conf file. This
example shows how to use cat to write typical kernel parameter settings for an Oracle database:

cat >> /etc/sysctl.conf <<EOF
kernel.shmall = 2097152
kernel.shmmax = 536870912
kernel.shmmni = 4096
kernel.sem = 250 32000 100 128
fs.file-max = 65536
net.ipv4.ip_local_port_range = 1024 65000
net.core.rmem_default = 262144
net.core.rmem_max = 262144
net.core.wmem_default = 262144
net.core.wmem_max = 262144
EOF


The previous command uses cat to write to the /etc/sysctl.conf file all the values encap-sulated between the two EOF markers. This allows you to add several parameters simultaneously
to the /etc/sysctl.conf file. When using cat and >> to write parameters to the /etc/sysctl.conf
file, there is no automatic checking to determine whether the parameters already exist in the file.
Using cat and >> will simply write to the bottom of the file.
After the desired changes are made, use the sysctl -p command to make the entries in the
/etc/sysctl.conf file the current values used by the Linux kernel, as shown here:
sysctl -p

Simple way to gather system and kernel informations from your Unix / Linux system

The Proc File System can be used to gather useful information about the system and the running kernel.
Some of the important files are listed below

  • /proc/cpuinfo - information about the CPU (model, family, cache size etc.)
  • /proc/meminfo - information about the physical RAM, Swap space etc.
  • /proc/mounts - list of mounted file systems
  • /proc/devices - list of available devices
  • /proc/filesystems - supported file systems
  • /proc/modules - list of loaded modules
  • /proc/version - Kernel version
  • /proc/cmdline - parameters passed to the kernel at the time of starting

Friday, June 8, 2012

Shell script to calculate Tablespaces sizes in Oracle

This shell take an ORACLE_SID as parameter and calculate in MB the sizes of tablespaces

User / Group management in Red Hat Linux Enterprise

One of the most common administrative tasks is working with user and group accounts. The commands i use most often are
  • useradd — Creates user login accounts 
The useradd command creates new user accounts and, when invoked with the
-D option, modifies the default values applied to new accounts. As a result, it can
be invoked in two ways. The syntax of the first form is

useradd [-c comment] [-d home_dir] [-e expire_date]
[-f inactive_time] [-g initial_group] [-G group[,...]] [-m [-k skeleton_dir] | -M]
[-p passwd] [-s shell] [-u uid [-o]] [-n] [-r] username

  • userdel — Deletes user login accounts
  • usermod — Modifies user login accounts
  • passwd — Sets or changes account passwords
The  passwd command, generally regarded as  “the password changing utility,”
actually has more capabilities than merely changing passwords. In general, it
updates all of a user’s authentication tokens, of which the login password is only
one. Its syntax is:

passwd [-dkluf] [-S] username

-d removes the password for username, disabling the account. -k causes passwd
to update only expired authentication tokens (passwords, in this case). -l or -u lock
or unlock, respectively, username’s password by placing and removing a ! in front
of username’s password in /etc/shadow. The -S option, finally, displays a short
status message about  username, indicating whether the account is locked or
unlocked, the kind of encryption used, and so forth.
  • chsh — Sets or changes a user’s default shell
chsh [-s shell ] [-l] [username]

-s  shell sets  username’s login shell to  shell. Unless configured otherwise,
shell can be the full pathname of any executable file on the system. One common
way to take advantage of this feature is to disable an account by setting shell to
/bin/false or another command that does not give the user a login prompt. Using
the -l option displays the shells listed in /etc/shells
  • chage — Modifies password expiration information